

BookWright tips, features, and tricks you should be using
Maybe you’ve used Blurb’s free bookmaking software BookWright before. Maybe it’s your first time. Maybe you’re a BookWright pro, ready to judge us if your favorite hack isn’t mentioned. Wherever you are in your bookmaking journey, there are a few BookWright tips, tricks, and shortcuts every creator should know. They’ll make your book its best and your work its easiest.
Nine BookWright features you can try today
It’s time to get into the features and tips you need to know. To supplement our favorite BookWright features, we asked Blurb’s creative evangelist (and BookWright fan) Dan Milnor to tell us about a few of the coolest yet little-known features bookmakers should know about—and use.
School’s in session! Open your custom notebook, and let’s begin.
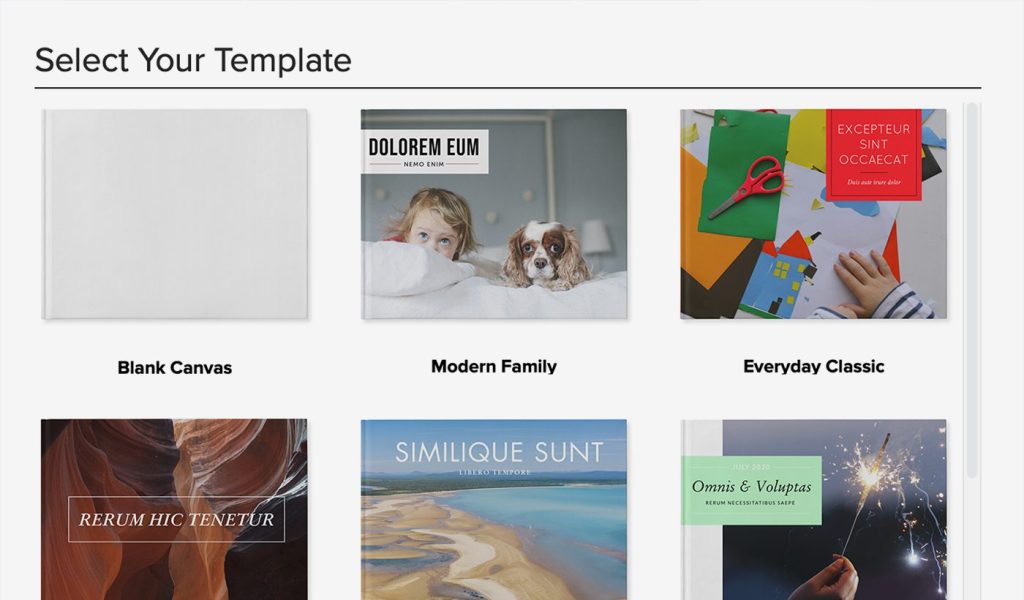
1. Try templates
You can have all the amazing photos in the world, but if you don’t know how to lay them out on the page, it can make for an arduous bookmaking project. Fortunately, BookWright has several professionally designed templates for different types of books. You can use any template for any reason, but here are our thoughts on what each one can bring to your photo book.
- Modern Family: Lots of spreads with ample white space where the focus is one to three key shots per page, great for family photo books.
- Everyday Classic: Less white space and bigger photos that fill each page.
- Road Trip: Large areas for landscape shots and images overlaid on each other.
- World Travel: A blend of Modern Family and Everyday Classic, perfect for travel books.
- Celebrations: Large and small images work together on the page to showcase every moment.
- Modern Romance: The perfect coupling of smaller signature shots mixed with full-bleed imagery for a stunning duo, ideal for wedding photo books or albums.
- Minimalist Portfolio: Artsy and edgy layouts that pop especially well with black-and-white imagery.
- Modern Portfolio: Askew and asymmetrical describes this untraditional template, great for any professional portfolio.
- Summertime: A versatile template with plenty of room for full-page portraits and multi-pic pages.
Pro tip: You can download even more templates if you’re making a cookbook, baby book, and more!
How to use a template
Using a template in BookWright is straightforward. Here’s a step-by-step guide on how to do it.
- Launch BookWright: Start by opening the BookWright app on your computer. If you don’t have it, download BookWright now.
- Pick a template: Select Book Templates on the left. Browse the options and choose one that fits your vision.
- Apply the template: Once you’ve found a template you love, select the size book you want to build. The template will apply, providing a framework for your content.
- Customize your book: Now, you can start adding your content to your book. Drag and drop your photos, text, and other elements into the spaces provided by the template. Remember, the template is just a guide—you can customize it as much as you want!
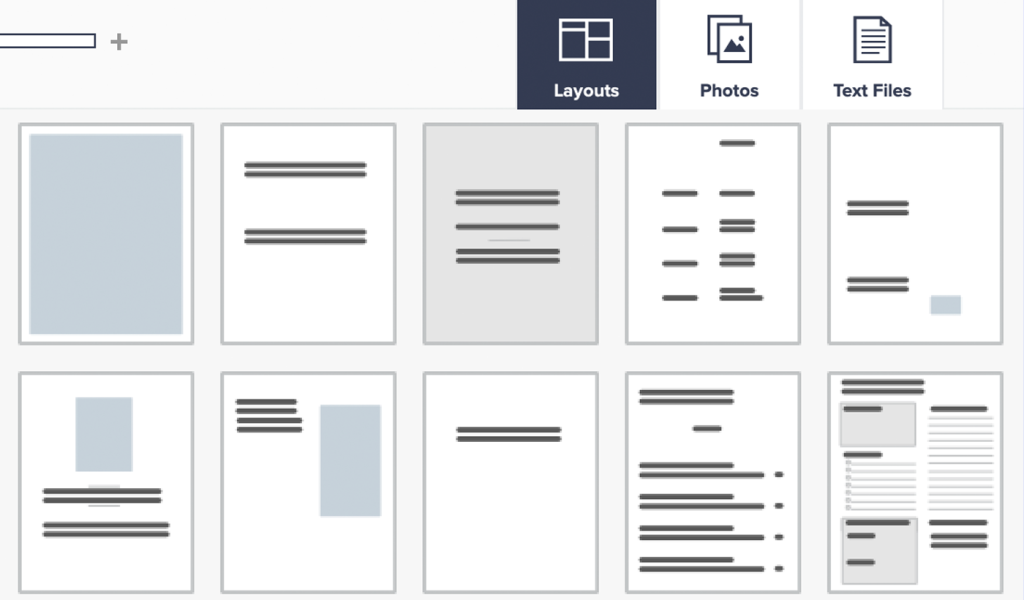
2. Use layouts
Staring at blank pages can feel quite daunting when starting any project. If you don’t feel like using an entire template to build your book but are still getting the blank page nerves, try layouts.
Think of layouts as the blueprint of a page or spread, rather than your entire book—like a template. Even if you’re a first-time bookmaker, layouts can help you craft a book that looks like it’s been designed by a pro.
Title pages, table of contents, novels, recipes, yearbooks, planners: Whatever you can dream up, we’ve got a layout for it. Once you select your ideal layout, you can drag and drop images and place text.
Best yet, you can even save your own layouts—if you have a page or spread design that you want to repeat again and again.
How to use a layout
Layouts are easy to apply in BookWright. Here are the steps to guide you through the process.
- Open your project: Create or open a project in BookWright.
- Select a page: On the left side of the screen, you will see a thumbnail view of all the pages in your book. Click on the page where you want to apply a layout.
- Choose a layout: At the top of the screen, select the Layouts tab. This will open a menu with many options. Browse the available layouts and choose one that suits your needs. Pro tip: The drop-down menu to the left of the layout options lets you filter layouts by category.
- Apply the layout: Simply select the layout you like. This will automatically apply it to the selected page.
- Customize your layout: Now that you have applied the layout, you can start customizing it. Add your photos, text, and other elements in the spaces provided by the layout. Remember, you don’t need to stick to the default layout design—feel free to make it your own!
- Repeat: Keep doing these steps for all the pages where you want to apply a layout.
How to build your own layout
Did you create a page or spread design you love? Save it so you can use that same layout again and again.
- Select your page or spread: On the left side of the screen, select the thumbnails of the page or spread you want to save as a layout.
- Navigate to the layouts tab: At the top of the screen, select the Layouts tab. This will open up a menu.
- Save your layout: In that same Layout tab, select the Save layout button. This will open a new window, allowing you to save it.
- Pick your page(s): Choose from the left page, right page, or entire spread.
- Name your layout: Enter a unique name for your new layout in the Layout Name field. Select Save Layout. Your custom layout will now be available in the My Layouts drop-down in the Layouts tab.
- Apply your custom layout: To apply your new layout to a page, select it from the My Layouts section.
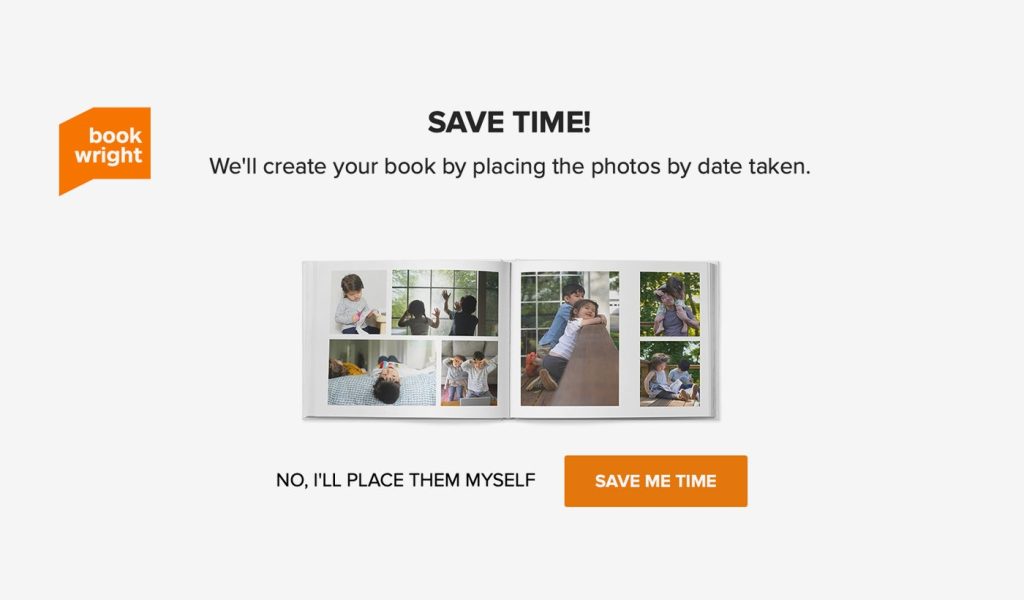
3. Automatically place your photos
Save a ton of time by letting BookWright auto-place your images in your book. Use these features in tandem with templates and layouts, and you can truly create a book in minutes.
You can choose to have BookWright place your images in chronological order with the Save Me Time feature. Or, you can auto-create your book by file name, date of import, last modification, or date taken (oldest to newest or the other way around). The choice is yours!
Imagine crafting a travelogue, a baby’s first year book, or a wedding photo album. Auto-placing images chronologically lets you recreate the journey as it unfolded in moments.
How to use the Save Me Time feature
This feature makes bookmaking a breeze. Here’s how to import and place all your photos in seconds flat.
- Create a project: Select Create from the homepage of BookWright. Then pick your book format and size, paper and cover type, and name and save your new project.
- Add photos: Select photos from your desktop or import them from a cloud service.
- Use Save Time: A pop-up window asks if you want to save time. This will allow BookWright to automatically place images chronologically. Select the Save Me Time button.
- Review and edit: After BookWright has autoflowed your images, review the placement. You can rearrange, add, or delete images as you like.
How to use the Auto-Create Book feature
It’s a snap to use this feature, too. Here’s how.
- Start the process: Open your project in BookWright and select the Photos tab near the top of the app.
- Choose your sort and direction: Select the first drop-down in the Photos tab. Sort your imported photos by imported date, date taken, modified date, or file name. Choose between newest to oldest or oldest to newest—or A to Z or the reverse.
- Select your folder: In the second drop-down, you can select your photo folder.
- Pick from used or unused photos: In the last drop-down, select all photos, photos used in the project, or unused photos. Selecting unused photos will help you auto-place images that you haven’t already placed!
- Activate Auto-Create: Select the Auto-Create Book button. This will create your book according to the chosen sequence and direction.
- Review and edit: Once BookWright has placed your images, review and edit!
4. Auto Flow long text
All you long-form writers and novelists out there will love this! Flowing in your text is a snap (and a few clicks). BookWright’s Text Flow feature does the heavy lifting for you, automatically fitting your text to any text box or frame.
Say goodbye to tedious manual formatting and say hello to a more efficient workflow. Now, you can focus on writing without worrying about the formatting of your text, saving you time and effort in the long run.
How to flow text
- Export as RTF: Export your writing as an RTF file (also known as Rich Text Format). You can usually find this option in File then Save As… in any word processing app (like Microsoft Word, Google Docs, or Open Office).
- Import your file: In BookWright, select Text Files in the top toolbar. Then select Add RFT Files to the left. Browse your computer for the file you want to import. Then select Open.
- Add your files to your book: Your imported RTF file(s) appear in blue in the toolbar, and you can drag and drop it right into your page.
- Apply a layout: Once you drag and drop, choose a layout. From there, you’ll select Apply Layout, and your text will magically auto-fill.
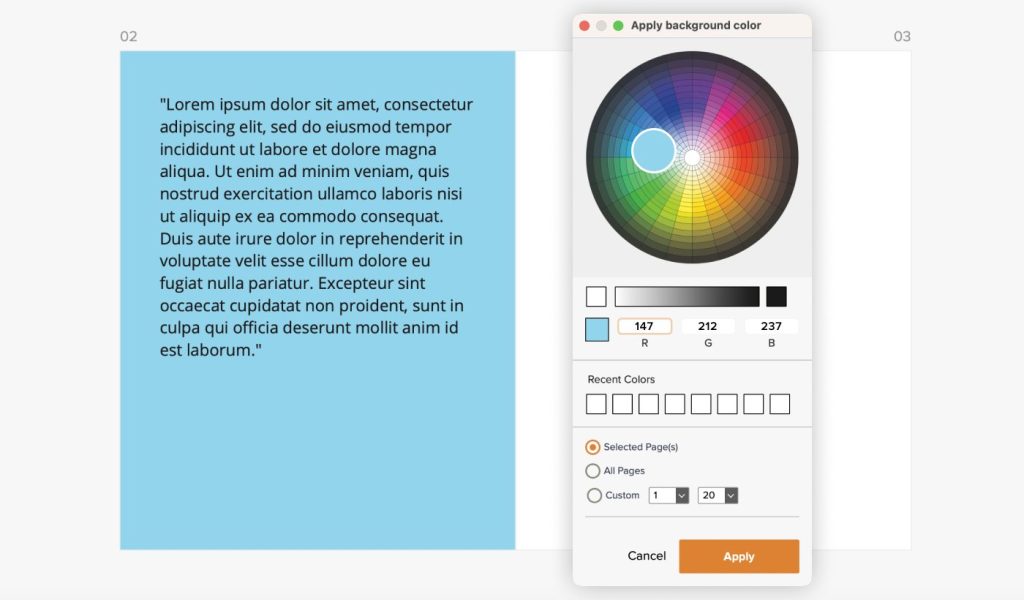
5. Add background colors
Adding a background color to your pages can enhance your book’s overall look and feel. You can easily compose a layout with depth just with a color behind your imagery, text, or illustrations.
A bold color creates a design that pops off the page. Or try to match a more muted color in the image with the background color for a cohesive look.
How to add a background color
- Select the paint can icon: It’s in the upper right corner of BookWright.
- Pick your color: The background color wheel window will appear. Choose the color you want from the wheel (or add your own RGB codes if you’re into that) and select Apply.
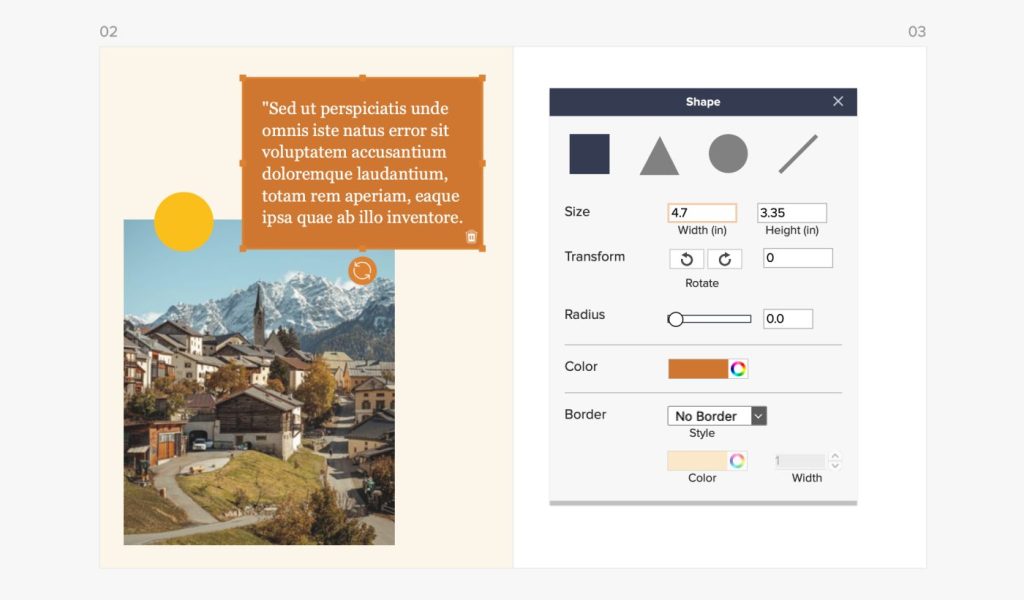
6. Build and overlap shapes
Shapes are a fun and creative way to add interest and depth to your book. You can use shapes as borders, backgrounds, or as design elements on their own.
BookWright offers a variety of shapes, including circles, rectangles, triangles, and lines. And the best part? You can easily overlap these shapes to create unique designs and a sense of depth on a flat page. Plus, shapes can also be filled in with color or images, making them even more exciting than just a simple design flourish.
Dan Milnor, Blurb’s creative evangelist, likes to fill black shapes post-printing with a white gel pen and white shapes with black ink. This creates a unique, hand-crafted look that adds character.
How to add a shape
- Select your page: On the left side of BookWright, select the thumbnail of the page you want your shape.
- Pick a shape: In the toolbar directly above your book’s pages, select the Shapes icon (near Undo, Place Photo, and Place Text). Then, choose the shape you want.
- Draw your shape: Click and drag on your page to create the shape at the desired size.
- Adjust color and placement: With your shape selected, use the shape window to adjust its size, color, rotation, border, style, and thickness.
- Add a photo: Select the Photos tab from the top of BookWright. Then, drag and drop the photo of your choice into your shape. Done!
- Overlap your shapes: Add another shape on top of your initial shape. The key to overlapping is using the Arrange tool, also found near the Shape icon, so you can bring your shapes from the back to the front or vice versa as you see fit.
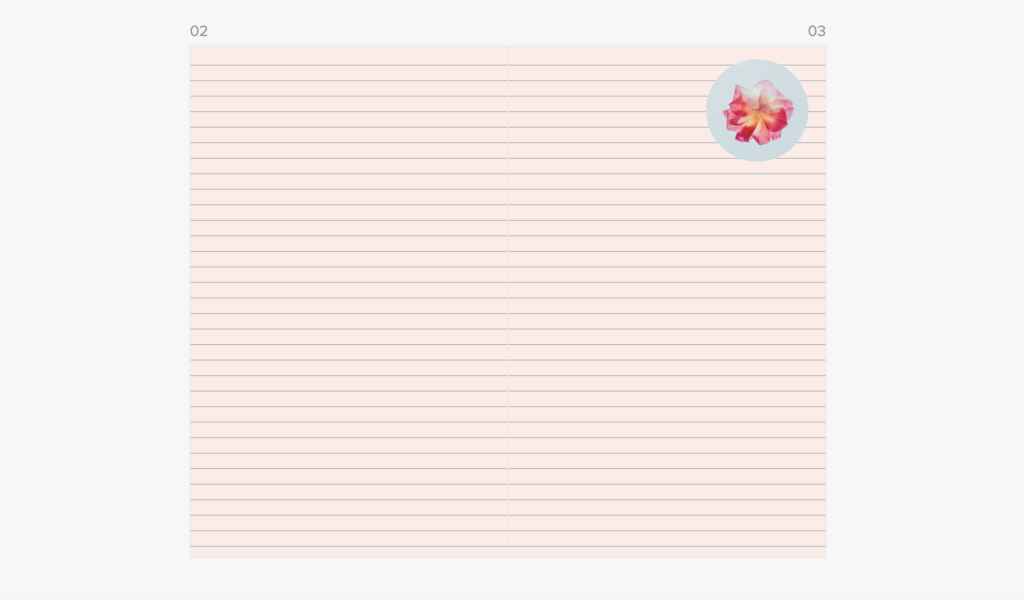
7. Use grids and shapes together
Making a journal or notebook? BookWright offers four kinds of pages: blank, lined, square, or dot grid. But why leave it at that? You can easily break up a massive grid page by using shapes on top, which you can fill with color or images.
Imagine having a lined page with a circle in the upper corner with a photo of your favorite flower or even a positive affirmation. These can be neat little accents to make the ordinary journal uniquely yours.
Add a colored shape behind a grid, and a cool hack will happen. You’ll need to see it to believe it!
How to add a grid and shapes
Adding grids to your pages is simple. But a word to the wise: You must create a notebook project to get grids. You can’t add a grid to your book if it is not a notebook! Let’s get into it.
- Create a notebook: Select Create from BookWright’s home screen. Then, choose Notebooks and the size you’d like to create. On the next page, select your style (blank, lined, or grid) and cover (hardcover or softcover). Finally, name and start your new project.
- Add a shape: In the toolbar directly above your book’s pages, select the Shapes icon (near Undo, Place Photo, and Place Text). Then, choose the shape you want.
- Draw your shape: Click and drag on your page to create the shape at the desired size.
- Adjust shape style and placement: With your shape selected, use the shape window to adjust its size, color, rotation, border, style, and thickness.
- Arrange your shape: Make your notebook even cooler by selecting the Arrange icon near the Shape icon to place it behind your grid. If you add a background color to your shape and send it backward, behind your grid, cool things will happen!
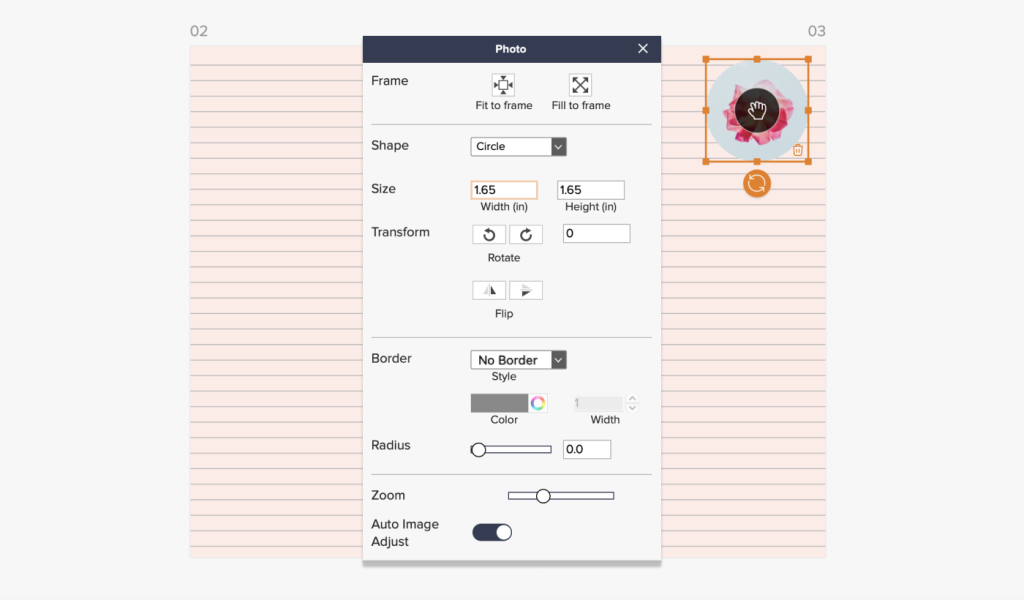
8. Enhance images
Shots that are too dark, a bit fuzzy, have people with red eyes, and a dozen other photo faux pas can all benefit from the Auto Image Adjust feature. It’s built right into BookWright, and you can use it on a single image or apply the setting to all the images in your book.
When activated, this feature analyzes images and automatically optimizes them for printing by enhancing the darker areas, slightly increasing depth and contrast, and lightly sharpening. The feature can also brighten photos without losing any detail and correct skin tone issues when they appear too red or green. It’s magic!
How to enhance your image
It’s so easy to use! Just follow these two steps.
- Toggle it on: To turn Auto Image Adjust on for one image, simply click on an image to open its photo tools, then toggle the feature to On.
- Apply to all images: If you want to apply this feature to every image, open BookWright’s Preferences window and select Auto-adjust all images added to project. This will automatically improve all the photos you add to your book project after you’ve changed this setting.

9. Include page numbers
Page numbers are important for keeping your book organized and easy to follow. They also act as a reference for readers to find specific pages quickly. Fortunately, BookWright makes it easy to add page numbers that will automatically update as you make changes or rearrange your book’s layout.
Whether you want to add page numbers to every page, just the left-hand pages, or just the right-hand pages, BookWright gives you several options. And yes, you can omit page numbers altogether, too.
Pro tip: Page numbers are all or nothing. So if you don’t want page numbers on certain pages, you’ll need to add an image or shape (perhaps in the same color as the page color) over the page number to hide it.
How to add page numbers
You’re a BookWright pro at this point. Let’s finish off with another quick step-by-step.
- Select your pages: To add, remove, or format page numbers, select the 123 icon.
- Choose your settings: Select where you want your page numbers to display and any formatting. You can also choose the page to start and end the numbering.
- Remove your page numbers: To remove page numbers, click the Remove Page Numbers button in this same window.
And there you have it: the BookWright features we most like to use and most love to tell others about. Ready to use these tips and tricks on your next book project? Try BookWright today.
***
Blurb is a self-publishing platform that allows you to take control of your book publishing journey—whether you’re building a book for yourself and friends or for mass distribution. Blurb’s free design tool, BookWright, allows you to create the book of your dreams in minutes. Once ready, order copies for yourself or publish and sell—or do both at the same time.